About The Saturday Chef

Midwest, United States
I am NOT a professional chef. I am what I affectionately dub a Saturday Chef—a weekend warrior of the culinary variety, fortified by the education I have gleaned from two high school cooking classes, the Food Network and my own gastronomical experiments. While I’m not ashamed to spend all day making bagels by hand, and proudly call myself a foodie, I’m not a food snob. I enjoy an Extra Value Meal as much as the next girl. My culinary escapades are still relegated to the weekends, but my love for cooking is stronger than ever, galvanized by more successes than failures, and the beautiful fact that the more I cook, the more people there are to feed. So please stay tuned for fun recipes, inevitable disasters and hopefully, a lot of good food.

Friday, December 24, 2010

Gingerbread Snowflakes (and More Merry Treats)

Christmas is coming.  The goose getting fat.  Or that's just me from all the taste-testing and coopie swaps. 
I spent the better part of two days in the kitchen baking a dessert basket for my family.  I got a little carried away and ended up making so many delicious sweets that my kitchen resembled a buffet fit for Mr. Claus himself. 

I've never made gingerbread cookies before.  I've made edible houses with it (that probably were unsafe even for gumdrop people) and I've smelled the artifical gingerbread in latte and candle form around this time of year.  The cookie itself is spicy and unique and not at all sweet.  Rolling them out is a mini work-out for the arms.  Decorating them is always a sugary good time!   And the benefits?  Frosting with painfully sweet icing is almost a must and your house smells like all things Christmas.  It'll have even the greenest grinch singing carols in no time. 

Photobucket

Gingerbread Snowflakes
by Marth Stewart
6 cups all-purpose flour, plus more for work surface

1 teaspoon baking soda

1/2 teaspoon baking powder

1 cup (2 sticks) unsalted butter

1 cup packed dark-brown sugar

4 teaspoons ground ginger

4 teaspoons ground cinnamon

1 1/2 teaspoons ground cloves

1 teaspoon finely ground pepper

1 1/2 teaspoons coarse salt

2 large eggs

1 cup unsulfured molasses

Directions

1.Sift together flour, baking soda, and baking powder into a large bowl. Set aside.

2.Put butter and brown sugar in the bowl of an electric mixer fitted with the paddle attachment; mix on medium speed until fluffy. Mix in spices and salt, then eggs and molasses. Reduce speed to low. Add flour mixture; mix until just combined. Divide dough into thirds; wrap each in plastic. Refrigerate until cold, about 1 hour.

3.Preheat oven to 350 degrees. Roll out dough on a lightly floured work surface to a 1/4-inch thick. Cut into snowflakes with a 7- inch snowflake-shape cookie cutter. Space 2 inches apart on baking sheets lined with parchment paper, and refrigerate until firm, about 15 minutes.

4.Bake cookies until crisp but not dark, 12 to 14 minutes. Let cool on sheets on wire racks.

5.Put icing in a pastry bag fitted with a small plain round tip (such as Ateco #7). Pipe designs on snowflakes; immediately sprinkle with sanding sugar. Let stand 5 minutes; tap off excess sugar. Let icing set completely at room temperature, about 1 hour. Store cookies between layers of parchment in an airtight container at room temperature up to 5 days.

Royal Icing


2 egg whites
2 teaspoons fresh lemon juice
3 cups confectioner's sugar

Beat egg whies and lemon juice in an electric mixer until frothy. Add sifted sugar. Beat until smooth.

Sprinkle cookies with colored sanding sugars immediately after frosting. 

Photobucket

Best.  Blizzard.  Ever!


Other Treats and Recipes!

Photobucket

Recipe for Salted Caramel Puffs is HERE.

Photobucket

Recipe for Chocolate Toffee Pretzels is HERE.

Photobucket

Recipe for Fantastic Five-Layer Bars is HERE.


Photobucket

Add some cellophane bags, festive ribbons and VIOLA!  You have a gift for the entire family.

Sunday, December 12, 2010

Perfect Holiday Breakfast: Gooey, Amazing Cinnamon Rolls

Photobucket

I often ask people what their last meal would be before shuffling off this mortal coil.  It is interesting to see what people want as the final tastes on their tongues.  I've gotten everything from steak and lobster to sushi to chocolate cake and frosty, cold milk.

My answer varies from day-to-day, craving-to-craving. Right now, it would be a crunchy, golden brown plate of frites with sea salt and malt vinegar with a flame-broiled burger with cheese, bacon and roasted garlic aioli. Or maybe the salmon risotto dish I tasted at Emeril Lagasse’s restaurant at Loew’s Miami Beach years ago. The entrée always changes, but dessert never has. So when I’m 114 years old and on my deathbed, and my rich, exotic 80-year-old husband asks me want I want to eat, I’ll breathlessly ask for…*drumroll* …a gooey, decadent, buttery cinnamon roll.

This breakfast/lunch/dinner/any-time-of-the-day food is one of my carved-in-stone favorites, although I eat and make them more in the winter.  Paired with hot chocolate, it’s the perfect cure for anything Jack Frost can dish out. Like The Winter of Unemployment and 100 Inches of Snow. Or the Post-Christmas credit card bill. Or cabin fever created by the blizzard that’s raging outside right now.

It’s also the perfect thing for Christmas morning. I know, I know, I hear the groans. You have to wrap the presents or go to this party or even do last minute shopping with your cousin who always procrastinates. But you can do this too because making these treats is not nearly as daunting as it seems, especially if you have the right recipe. After trying out a few different ones, this one is it!

There are just a few steps to making cinnamon rolls, but they're simple and fun!

Knead ‘N Rise

Photobucket
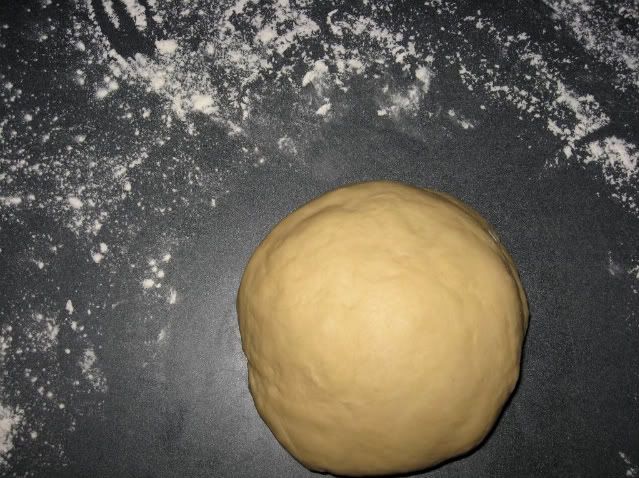
Dough has been kneaded and is ready to rise. 

 Roll ‘N Fill

Photobucket
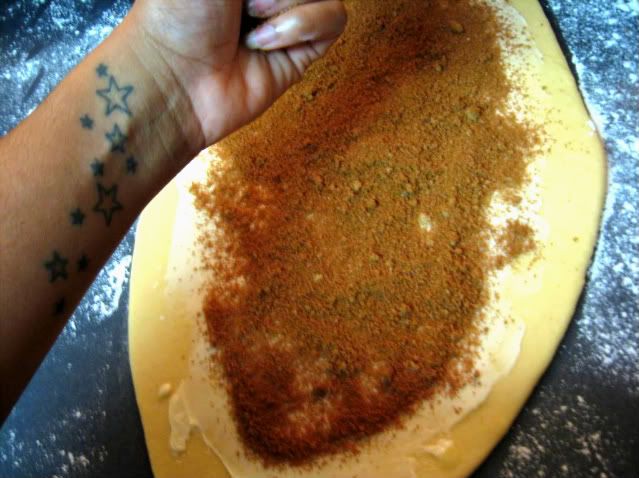
After rising, dough has been punched down; rolled flat; and filled with butter, brown sugar and cinnamon. 

Photobucket
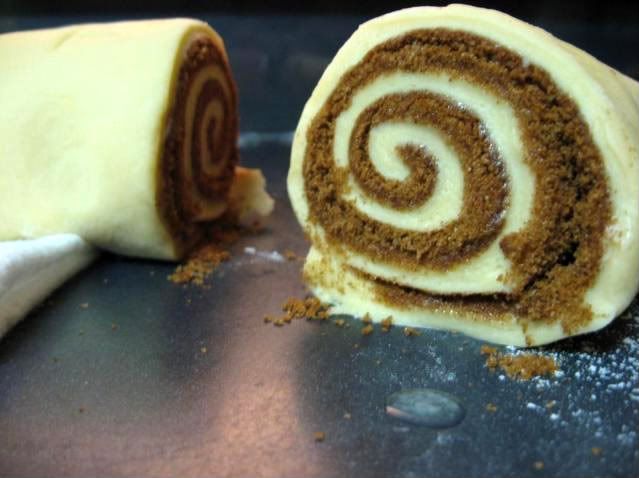
Rolling is easy and fun.   Any sugar that falls out, just add to empty spaces in the baking pan.

Proof ‘N Bake

Photobucket
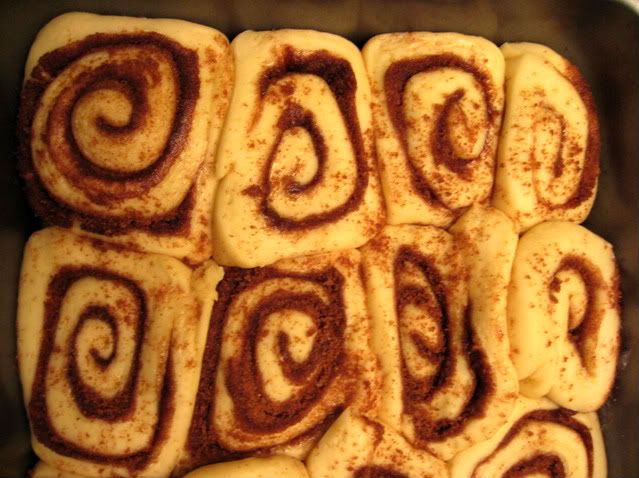
Rolls have proofed and ready to to bake!  Aww, they're cute, aren't they?


Glaze 'N Enjoy! 

Photobucket
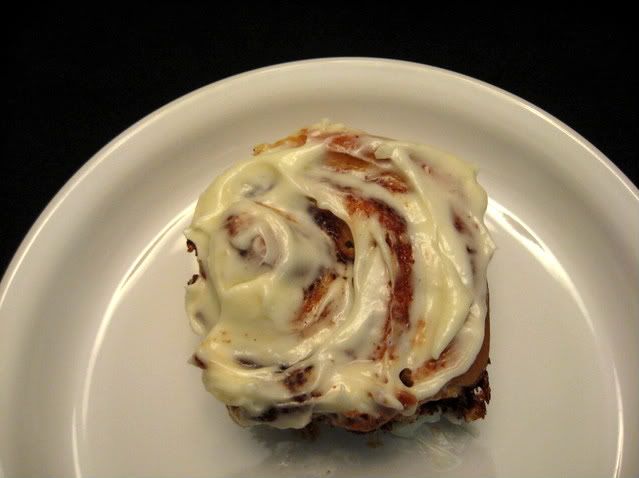
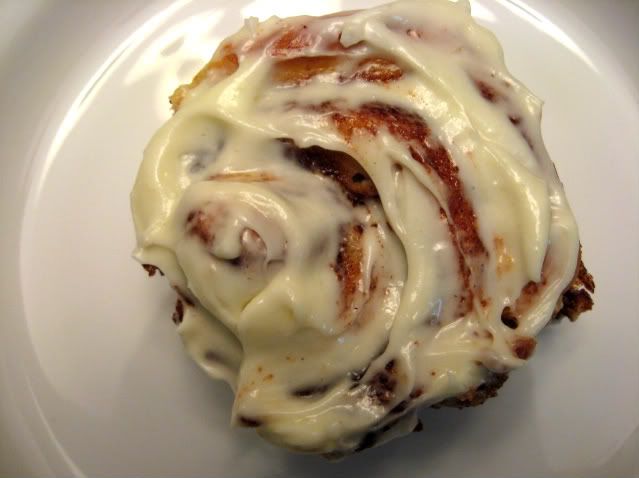
Ready to be eaten.  The fruits of your labor! 

(If you have to ask, then yes, these are technical names for the steps.)

You probably already have nearly all of the ingredients, except yeast.  You get a gold star if you have the yeast. 
Bake these little treats the day before, seal them up in an airtight container, and re-heat them in the morning, and it’s the perfect culinary present for your friends and family. 

And you know how the scent of Cinnabuns lures people to the food court at the mall in a haze of need and  joy?  That happens when you bake these, too.  You're welcome.

Oh, and don’t forget to leave one for Santa. It’ll be a nice break from all of the cookies!


Cinnamon Rolls with Cream Cheese Glaze
epicurious.com


Dough:
1 cup whole milk

3 tablespoons unsalted butter

3 1/2 cups (or more) unbleached all purpose flour, divided

1/2 cup sugar

1 large egg

2 1/4 teaspoons rapid-rise yeast (from 2 envelopes yeast)

1 teaspoon salt

Nonstick vegetable oil spray

Filling:
3/4 cup (packed) golden brown sugar

2 tablespoons ground cinnamon

1/4 cup (1/2 stick) unsalted butter, room temperature

Glaze:
3 ounces cream cheese, room temperature

1 cup powdered sugar

1/4 cup (1/2 stick) unsalted butter, room temperature

1/2 teaspoon vanilla extract

Directions
For dough:
Combine milk and butter in glass measuring cup. Microwave on high until butter melts and mixture is just warmed to 120°F to 130°F, 30 to 45 seconds. Pour into bowl of stand mixer fitted with paddle attachment. Add 1 cup flour, sugar, egg, yeast, and salt. Beat on low speed 3 minutes, stopping occasionally to scrape down sides of bowl. Add 21/2 cups flour. Beat on low until flour is absorbed and dough is sticky, scraping down sides of bowl. If dough is very sticky, add more flour by tablespoonfuls until dough begins to form ball and pulls away from sides of bowl. Turn dough out onto lightly floured work surface. Knead until smooth and elastic, adding more flour if sticky, about 5 to 8 minutes. Form into ball.

Lightly oil large bowl with nonstick spray. Transfer dough to bowl, turning to coat. Cover bowl with plastic wrap, then kitchen towel. Let dough rise in warm draft-free area until doubled in volume, about 2 hours.

For filling:
Mix brown sugar and cinnamon in medium bowl.

Punch down dough. Transfer to floured work surface. Roll out to 15x11-inch rectangle. Spread butter over dough, leaving 1/2-inch border. Sprinkle cinnamon sugar evenly over butter. Starting at 1 long side, roll dough into log, pinching gently to keep it rolled up. With seam side down, cut dough crosswise with thin sharp knife into 18 equal slices (each about 1/2 to 3/4 inch wide).

Spray two 9-inch square glass baking dishes with nonstick spray. Divide rolls between baking dishes, arranging cut side up (there will be almost no space between rolls). Cover baking dishes with plastic wrap, then kitchen towel. Let dough rise in warm draft-free area until almost doubled in volume, 40 to 45 minutes.

Position rack in center of oven and preheat to 375°F. Bake rolls until tops are golden, about 20 minutes. Remove from oven and invert immediately onto rack. Cool 10 minutes. Turn rolls right side up.

For glaze:
Combine cream cheese, powdered sugar, butter, and vanilla in medium bowl. Using electric mixer, beat until smooth. Spread glaze on rolls when they are warm. Serve warm or at room temperature.  Store leftovers in an airtight container and re-heat before serving.

Chef's Note: I do recommend trimming the edges of the dough so you have straight lines before filling.  I did not when I made them for photos, and got some oddly shaped, cinnamony knobs after baking.  Delicious but a little weird.

Chef's Note 2:  I didn't have the right size glass pans as I made these for Thanksgiving morning, so I used a regular 9x13 baking pan without a problem.  The rolls fit and the misshapen pieces went into a smaller pan.

Wednesday, December 1, 2010

The Power of Ganche: Chocolate Torte with Pistachios

Photobucket

Sometimes, I understand how silly foodies can be. I feel it when I’m running around the kitchen, photographing chopped blueberries in natural light and artfully arranging plates of food when everyone else just wants to eat it. Maybe it’s a romantic and slightly naïve sentiment, but I truly believe in the power of good food—that it can nourish the soul as well as the body.

There’s one food that I think has the power to heal the world. Two words, say it with me, Chocolate Ganache.

It’s a painfully simple mixture of chocolate and cream, yet I’m pretty sure it has supernatural powers. It could end the war, keep Charlie Sheen sober, make M. Night Shyamalan movies good again!

It already demonstrated its powers just this Thanksgiving. I was making a Chocolate Torte for the feast’s dessert. It baked perfectly, yet when I tried to remove it from the pan, it wasn’t coming out. After twenty tense, nail-biting minutes of scraping and running over the burner, and getting my mom to help, my sister had to bang and pry it out of the pan because I was too scared to do it.  It was mostly whole and still completely delicious, but it was rough around the edges. It wasn’t perfect, and I was upset. Because it was THANKSGIVING and IT NEEDED TO BE PERFECT! (Of course, the meal was anything but perfect, as most holiday meals are, but the food was excellent, and no one else cared that due to minor problems and setbacks, we didn’t eat until almost eight.  Dinner was scheduled for six.)

Photobucket

Enter the ganache. I poured it over the cake and it covered the tears and small divots, and kept me from having to resort to cake surgery and the consequent “it looks weird, but it tastes GREAT!” dance for my family.

Photobucket

It was a Thanksgiving Miracle!! And the power of ganache!

Ultimately, the dessert came together winningly, the torte was dense and sweet; the ganache was velvety and robustly chocolate; the pistachios added some crunch and luxury to an already elegant dish.

So you work on making this torte and believing in the power of food. And I’ll go feed some of this to M. Night Shyamalan, and see if we can get another miracle.

Photobucket

Torte

1/2 cup (1 stick) unsalted butter, cut into small pieces, plus more for pan
1 cup all-purpose flour (spooned and leveled), plus more for pan
1/2 teaspoon salt
1/4 teaspoon baking powder
8 ounces semisweet chocolate chips
1 1/4 cups sugar
1 teaspoon pure vanilla extract
2 large eggs
1/2 cup low-fat buttermilk

Ganache
1/2 cup heavy cream
4 ounces semisweet chocolate chips

1/4 cup shelled, unsalted pistachios, coarsely chopped


Directions
Make cake: Preheat oven to 350 degrees. Butter and flour an 8-inch round cake pan; line bottom with parchment or waxed paper. In a medium bowl, whisk together flour, salt, and baking powder. Set aside.

In a large heatproof bowl set over a saucepan of simmering water, melt butter and chocolate, stirring frequently, 4 to 5 minutes Make sure the water does in the saucepan does not touch the bowl. Remove bowl from pan. Whisk in sugar and vanilla, then eggs, and buttermilk. Fold in flour mixture just until combined.

NOTE: The chocolate wasn’t too hot after melting, but tempered in the eggs by whipping them slightly with the buttermilk adding a bit of the chocolate before adding that mixture to the chocolate. I didn’t want to take the chance of the eggs cooking when added to the warm chocolate.  Also, you want to make sure the buttermilk is at room temperature or close to it.

Pour batter into prepared pan. Bake until a toothpick inserted in center comes out with a few moist crumbs attached, 55 to 70 minutes, depending on your oven. Let cool in pan 5 minutes; run a knife around edge, and invert onto a wire rack. Remove paper, and let cool completely, about 3 hours. (To store, wrap in plastic, and keep at room temperature, up to 3 days).

Make ganache: In a small saucepan, bring cream to a simmer, stirring often. Remove from heat. Add chocolate, and let stand 5 minutes; whisk until smooth. Let cool until mixture falls back in ribbons when lifted with a spoon. It shouldn’t take more than 5 to 10 minutes.

Set cake on a serving platter; tuck strips of parchment paper under edge of cake to prevent ganache from dripping on platter. Pour ganache onto center of cake; using a table knife, spread evenly over the top and let it drip down the sides.  Let set, about 30 minutes. Remove paper from under cake; sprinkle top with pistachios.

Chef's Note: Make sure you remove the torte from the pan 5 to 10 minutes after baking.  I didn't, and you know what happened.  ;-)