About The Saturday Chef

Midwest, United States
I am NOT a professional chef. I am what I affectionately dub a Saturday Chef—a weekend warrior of the culinary variety, fortified by the education I have gleaned from two high school cooking classes, the Food Network and my own gastronomical experiments. While I’m not ashamed to spend all day making bagels by hand, and proudly call myself a foodie, I’m not a food snob. I enjoy an Extra Value Meal as much as the next girl. My culinary escapades are still relegated to the weekends, but my love for cooking is stronger than ever, galvanized by more successes than failures, and the beautiful fact that the more I cook, the more people there are to feed. So please stay tuned for fun recipes, inevitable disasters and hopefully, a lot of good food.

Saturday, September 17, 2011

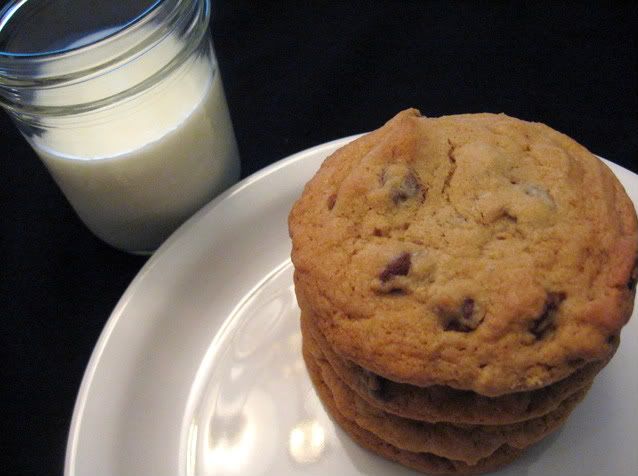
The Best Chocolate Chip Cookies Ever

Photobucket

I’m actually embarrassed to make the forthcoming confession, but I’m going to do it anyway, because this is a safe place of sharing. 

Here it is:  I went to one of those yuppy suburban high schools, the kind that’s very similar to West Beverly High on “90210,” where the kids go to a school with uniforms and the scoreboards provided by Pespi, and have an Olympic-sized swimming pool and a field house with joint-cushioning springs underneath.  

I’m not ashamed of my high school, because I got a great education and had a great time.  More than that, I had some amazing lunches.  Because our cafeteria was awesome.  It was better than the food served in college, and even in some restaurants.  I had access to salads, burgers, fries, hot pretzels, chicken sandwiches, fried cheese on Tuesdays, and even had two different flavors of low-fat ice cream twice a week.  It was ‘til this day some of the best food I’ve ever had…and 11 years later, I still crave two things: salty French fries and nacho cheese, but mostly, the chocolate chip cookies.  

I am a Cookie Monster.  I inherited the gene from my grandmother, and the cookies I had at that school, the cookies I could smell baking in the hallway around the start of fourth period, were the best chocolate chip cookies I’ve ever had.  And the reason my dessert of choice, my treat after a crappy day, my favorite snack to sneak into the movies is chocolate chip cookies.  

A year ago, I set out to find the best chocolate chip cookie recipe, one that rivaled my high school’s freshly baked delights.  

The recipe on the back of the Nestle Semi-Sweet Chocolate Chip bag was a good start, but I knew I could do better.  And I tried a few others that were good, but they just weren’t right.  I also refused to make a recipe by Jacques Torres that requires bread flour, a chocolate so fancy  I couldn’t even find or afford it and 24 hours. After awhile, I felt like the Goldilocks of Chocolate Chip cookies.  

Until I discovered this recipe.  

And they are by far, the most perfect chocolate chip cookie that’s ever come out of my kitchen.  They’re easy to make, chewy, chocolaty, decadent and with a little pinch of sea salt, they are a bit more complex than the average cookie.  

So I might not use calculus or chemistry, but this is one lesson from high school I'll never forget.  Go Highlanders!


Best Chocolate Chip Cookie Ever
Adapted from Savory Sweet Life
Yield: About 3 dozen

Ingredients
1 cup (2 sticks) salted butter, softened
½ cup granulated sugar
1 ½ cup dark brown sugar
2 eggs, room temperature
2 tsp vanilla extract

2 ¾ cup all-purpose flour
½ tsp. smallish-medium coarse sea salt, plus more for sprinkling (do not use table salt)
1 tsp. baking soda
1 ½ tsp. baking powder
2 cups semi-sweet chocolate chips

Directions
Pre-heat oven to 360 degrees. 
Cream butter, white and dark brown sugar until it is nice and fluffy, about 3 minutes on medium-high.  Add both eggs and vanilla and beat for another 2 minutes. 
In a separate bowl mix in flour, salt, baking soda and baking powder.  Whisk to combine.  Add half of flour mixture to sugar and eggs and beat just enough to incorporate.  Scrap down the sides with a spatuala and add the rest of the dry ingredients and blend again.  
Add the chocolate chips.  Mix until well-distributed.  The batter should be somewhat thick but airy. 
Drop about 2 tablespoons (or you can use a medium cookie scoop) onto a parchment-lined baking sheet.  Gently pat or shape cookies into a smooth round shape.  Sprinkle cookies with a scant amount of sea salt.  This is optional, but it adds great texture and the burst of salt both highlights and contrasts the flavors. 
Bake for 12 to 15 minutes or just until the cookies are a light golden broken.  Remove from the heat, but allow cookies to remain on the baking sheet for another 5 minutes, and then transfer to a cool, non-porous surface lined with parchment paper.  Allow cookies to cool for another few minutes. It will take the willpower of a saint, but try anyway.  ;)

Wednesday, July 20, 2011

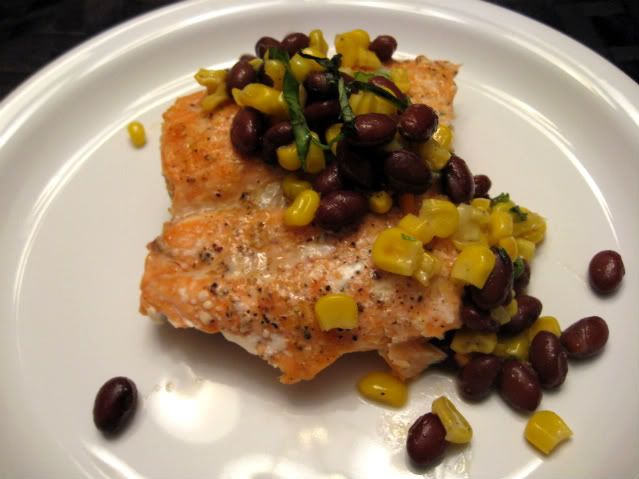
Baked Salmon with Sautéed Corn and Black Bean Salad


I must confess that when I first started cooking I was extremely nervous to work with seafood.  It’s expensive; it cooks quickly and if you ruin it, you’ve wasted the ingredients as well as the money used them buy them. When I fry shrimp, I cook them on high alert with a little knot in my stomach.  
I've also learned that with seafood, especially something as luxuriously rich as salmon, less is more.  When I splurge on salmon fillets, I simply bake it and pair it with a baked potato or a light vegetable salad.  I had inspiration for this dish, Baked Salmon with Sauteed Corn and Black Bean Salad, for months and I finally cobbled it together with different recipes and my own baked salmon.  It’s light, refreshing, impressive and deceptively simple.  In other words, it’s perfect for summer!  Especially if you’re in the middle of this brutal heatwave!  

Photobucket
Baked Salmon
1 ½ pound fresh salmon fillet
Butter
Seasoning Salt such as Lawry’s
Pepper
Garlic Salt
Olive Oil

Corn and Black Bean Salad
adapted from recipe at epicurious.com
2 cups sweet corn, removed from the cob or thawed if frozen
1 15 ounce can black beans, thoroughly rinsed
¼ cup green onions, thinly sliced
2 tablespoons cilantro, chopped
3 tablespoons fresh basil leaves, chopped
Salt, Pepper
Olive Oil
1 tablespoon of lime juice (from about 1 lime)
2  tablespoons fresh orange juice
2 tablespoons of olive oil
Pinch ground cumin

Salmon
Pre-heat oven to 375 degrees. 
Line baking sheet with aluminum foil, drizzle with about 1 tablespoon of olive oil and spread evenly.  Place fish on baking sheet. 
Season fish moderately with seasoning salt and pepper and conservatively with garlic salt.  Cut 2 pats of butter and cut or break it into pieces with your fingers.  Dot fish with butter. 
Place fish in oven and bake for 13 to 17 minutes or until fish is an opaque pink. 

Corn and Black Bean Salad
Heat skillet over medium heat and add about 1 tablespoon of olive oil.  When oil is hot, add corn.  Season lightly with salt and pepper.  Toss or stir frequently until corn is begins to brown, about 5 to 7 minutes. 
Remove from heat and set aside to prepare vegetables and herbs. 
Add corn, black beans, green onions, cilantro and basil to medium bowl and mix to combine.  Season with salt and pepper. 
Mix lime juice, orange juice, pinch of cumin and olive oil in a smaller bowl. Add most of dressing to corn salad and stir to combine.  Taste.  Salad should be moist, but not wet.  Add the rest if needed.  Set aside for 10 minutes. 
Place a portion of salmon on place about spoon on corn salad.  Drizzle with remaining dressing if you wish.  Enjoy! 


Wednesday, June 22, 2011

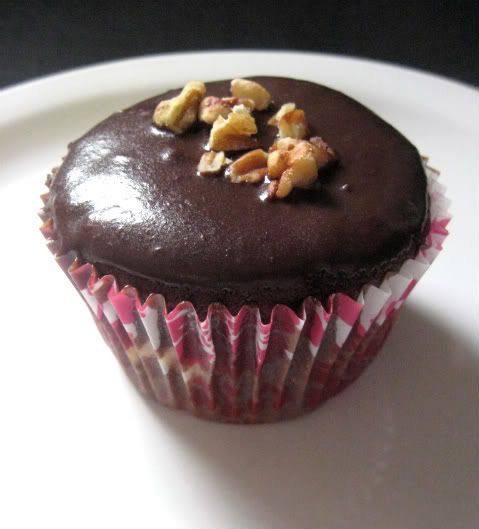
Chocolate Cheesecake Cupcakes


Photobucket

I have already spoken about the Power of Ganche, how I believe it has the ability to heal many things.  Life, especially in these charged times, can be hard.  It’s hard dealing with things like prolonged unemployment and all of the frustration that comes with it.  I have been without a paying job for more months than I can share without shame, and some days—usually the ones when I know a job I was cautiously excited about is filled—are especially maddening. 
Early one morning, I stumbled across a peppy, can-do woman hosting a Food Network show called “Chic and Easy.” She whipped up these cupcakes in a flourish of movement and optimism. 
At a more reasonable hour, I did the same, needing to accomplish something that day.  The result was one of the best desserts I’ve ever had.  They were rich and decadent and not overly sweet.  I don’t like messing with sticky frosting, because I manage to get it everywhere, but coating these fudgy gems was a mess-less breeze. 
So when life is bearing down a little too hard, try out these Chocolate Cheesecake Cupcakes and let the ganache do its job.


Photobucket

Chocolate Cheesecake Cupcakes with Ganache Frosting
by Mary Nolan

Ingredients

1 cup all-purpose flour
1/2 cup unsweetened cocoa powder
1 teaspoon baking powder
1/2 teaspoon salt 6 tablespoons butter, softened
3/4 cup sugar, plus 2 tablespoons
1 egg, at room temperature
2/3 cup milk, at room temperature

4 ounces cream cheese, softened
2 teaspoons vanilla extract
2 tablespoons mini semisweet chocolate chips
2 tablespoons chopped pecans

Ganache frosting, recipe follows

Directions

Place rack in the middle of oven and preheat to 350 degrees F.
Line 12 muffin cups with cupcake papers.
In a medium bowl, sift together the flour, cocoa powder, baking powder, and salt, and set aside. Using a mixer, cream the butter and 3/4 cup sugar until pale yellow, about 1 minute. Add the egg and stir until just combined. Gently add half of the flour mixture and stir until just incorporated. Mix in the milk. Add the remaining flour mixture and stir until combined. Set aside.
In a small bowl, mix together the cream cheese, 2 tablespoons sugar, and vanilla.
Stir in the chocolate chips and pecans.
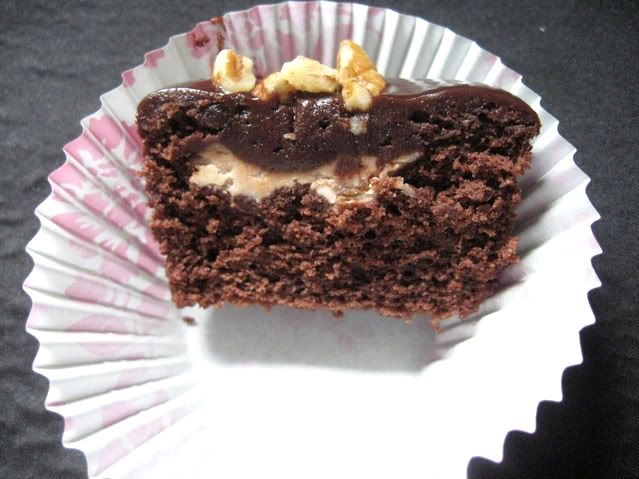
Fill prepared cupcake liners with enough chocolate batter to just cover the bottom. Add a dollop of the cream cheese filling to each (about a tablespoon), then top with remaining batter.  Filling cream cheese filling should not be visible.
Bake for 20 minutes. Let cupcakes stand in the pan for 3 minutes and then remove and allow to cool completely on a rack.
Dip each cupcake into the ganache, forming an even layer of frosting. Top with chopped pecans if you wish.  Place in the refrigerator to set, about 15 minutes.

Ganache Frosting:
3/4 cup semisweet chocolate chips
1/2 cup heavy cream
1/2 teaspoon instant espresso powder, optional
Place a heat-proof bowl over a pot of simmering water, and whisk together the chocolate, cream, and espresso powder (if using). Continue whisking until chocolate is melted and the mixture is thick, about 4 minutes. Remove from heat and let stand for 5 minutes.


Photo Crisis Averted!

You could only imagine my surprise when I checked out my blog one day on my brand new, awesome iPhone, and discovered that all of my pictures had been replaced with a really annoying "Bandwidth Exceeded" image (it's worse than the Twitter Fail Whale).  Apparently people took my photos and a really hot animation of "Supernatural's" Jared Padalecki doing shirtless chin-ups and linked them to their own sites without uploaded it to a separate account, thus draining my bandwidth.  Grrrrrr.

All of that unpleasantness has been remedied, so enjoy the restored pictures and recipes.  A new post will be up ASAP, and it's an awesome one!

Kira, Saturday Chef

Monday, June 6, 2011

Veggies At Last: Asian Chicken Salad

I was perusing my blog last week, tweaking older recipes and deleting some embarrassing ones, and I noticed that there was nary a vegetable side dish or entrée posted.  And I worried if people thought that I didn’t like vegetables or if I had scurvy.

While I don’t crave the sweet crunch of a carrot, I am pretty partial to vegetables.  Thus, I immediately looked for a scrumptious veggie-only dish to post.
For the record, I actually love salad, especially a good Greek one with no anchovies and lots of feta and black olives.  But I digress. This salad is different as it uses Napa Cabbage, which is a new, and pretty awesome, ingredient for me.   I really loved the idea of using a peeler to shave ribbons of carrots and how the whole thing came together rather quickly with the work of my Ginsus.  This salad is very refreshing and sweet, and while I didn’t photograph it with the low mein noodles, they are the perfect addition of crunch and texture.  The dressing is tangy and a little sweet, and compliments all ingredients wonderfully. 

Don’t worry, fellow Saturday Chefs, this might be the first veggie-centric post, but it will not be the last!  


Asian Chicken Salad
Adapted from recipe by Giada De Laurentiis
 
Salad:
1 large carrot, peeled
3 cups shredded napa cabbage, about ½ of a cabbage
3 cups shredded romaine lettuce, from 1 small romaine heart
1 small red bell pepper, seeded and deveined, thinly sliced
2 tablespoons fresh mint leaves, chopped
2 cups chicken breasts, cooked
Chow Mein Noodles, optional
Dressing:
1/4 cup vegetable oil
2 tablespoons low-sodium soy sauce
2 tablespoons rice vinegar
1/2 teaspoon granulated sugar
Black Pepper, optional

Directions
For the salad: Using a vegetable peeler, shave the carrot and add to a large salad bowl. Stir in the cabbage, lettuce, red bell pepper, mint, and chicken. *If you're a vegetarian, just nix the chicken.
For the dressing: In a small bowl, whisk together the oil, soy sauce, vinegar, and sugar until smooth.  Season with pepper, to taste, if using.
Plate salad in a mound, spoon a bit of the dressing over the salad and toss. Garnish with the chow mein noodles and serve.
Chef’s Note:  I only dress an entire salad if I know the majority of it will be eaten.  Otherwise, I just dress the salad on the plates just before serving. 

Friday, May 27, 2011

Blueberry Crumb Cake

When I was fifteen, I used to listen to my parents’ old comedy tapes.  Yes, the NSYNC and Christina Aguilera obsession would come years later as I was a late-bloomer in every regard.  On my favorite tape, Bill Cosby famously boasted about the nutritious benefits of chocolate cake for breakfast (EGGS!!!  MILK!!!!  WHEAT!!!), and I have taken it to heart as wisdom and truth.  If a decadent, gooey chocolate cake is satisfactory for breakfast, then certainly a Blueberry Crumb Cake has to be even better, because it has fruit!  FRUIT!
Like a lot of my favorite recipes, I made this cake on a whim.  My mom needed a dessert for a party at work and didn’t remember until the last minute.  I went through the cabinets and found I had all of the ingredients to make this cake, and it was in the oven twenty minutes later (I cannot make a decent layer cake from scratch to save my life, so if I can make this and share it with you all, you can do it too!).
My mom later told me that the cake was gone in less than fifteen minutes after she sat it out.  After I had a decent slice, I understood why.  The cake is lightly sweet; the streusel is spicy and sweet and the blueberries provide a sharp tang.  It’s the perfect contrast of taste, and it’s surprisingly light, making it perfect for breakfast or dessert, if you must to be traditional.


Blueberry Crumb Cake
Ina Garten

Ingredients
For the streusel:
1/4 cup granulated sugar
1/3 cup light brown sugar, lightly packed
1 teaspoon ground cinnamon
1/8 teaspoon ground nutmeg
1/4 pound (1 stick) unsalted butter, melted
1 1/3 cups all-purpose flour

For the cake:
6 tablespoons unsalted butter, at room temperature (3/4 stick)
3/4 cup granulated sugar
2 extra-large eggs, at room temperature
1 teaspoon pure vanilla extract
1/2 teaspoon grated lemon zest
2/3 cup sour cream (full or reduced-fat)
1 1/4 cups all-purpose flour
1 teaspoon baking powder
1/4 teaspoon baking soda
1/2 teaspoon kosher salt
1 cup fresh blueberries
Confectioners' sugar for sprinkling

Directions
Preheat the oven to 350 degrees F. Butter and flour a 9-inch round baking pan. 

For the streusel:
Combine the granulated sugar, brown sugar, cinnamon, and nutmeg in a bowl. Stir in the melted butter and then the flour. Mix well and set aside. 

For the cake:
Cream the butter and sugar in the bowl of an electric mixer fitted with the paddle attachment on high speed for 4 to 5 minutes, until light. Reduce the speed to low and add the eggs 1 at a time, then add the vanilla, lemon zest, and sour cream. In a separate bowl, sift together the flour, baking powder, baking soda, and salt. With the mixer on low speed, add the flour mixture to the batter until just combined. Fold in the blueberries and stir with a spatula to be sure the batter is completely mixed.

Spoon the batter into the prepared pan and spread it out with a knife. With your fingers, crumble the topping evenly over the batter. (NOTE:  You probably won’t use all of the streusel topping.  I’ve made this cake a few times, and always had a little left over.  It does taste delicious, so feel free to use it all for an extra-crumby cake).  Bake for 40 to 50 minutes, until a cake tester comes out clean. Cool completely and serve sprinkled with confectioners' sugar.

Monday, May 16, 2011

Saturday Chef's Easy Marshmallow Pops


When I was little and bored, my dad and sister and I would play the taste-test game.  We would close our eyes and try to guess the item of food we were given.  Looking back, I think it was just a way for my parents to get more fruit and veggies in our systems, but back then it was wholesome family fun.  (At least until my dad gave me vinegar and we retaliated with liquid soap.  Needless to say that was the end of the taste-test game). 
I think that’s where I learned that playing with your food could be fun.  Thus one day when it was raining and hailing in late April, and my niece was visiting, I decided it was time to play with chocolate and marshmallows and whatever toppings I could find.  Marshmallow Pops are just now starting their fifteen minutes of culinary fame, and I see why.  They are delicious, easy and fun to make, and did I mention they are delicious.  The combinations of toppings are endless and they are perfect for entertaining.   
Going to a friend’s baby shower?  Use pink or blue sprinkles.  Have a boyfriend who loves S’Mores?  Use graham crack crumbs.  Want something fabulous and unique?  Try chopped bacon if you’re nasty!  


                                                       28 marshmallows and 28 lollipop sticks. 

                                                               Ready for a chocolate bath. 

                                                                Yes, I went there, and it was delicious!


Marshmallow Pops
12 ounces milk chocolate
25 to 30 large marshmallows
Toppings: 
chopped, toasted nuts
toasted coconut
sprinkles
graham cracker crumbs
bacon, cooked and chopped
Special Equipment:
25 to 30 lollipop sticks or popsicle sticks
Wax Paper

Push sticks into marshmallows.  Line a baking sheet with wax paper.  To toast coconut or chopped nuts, toss lightly in a skillet over medium heat.  Remove from heat and skillet when coconut is a light brown and/or when nuts darken slightly and are fragrant, about 3 to 5 minutes.
You will need to make a double-boiler.  Find a medium sized pot and heat-proof bowl.  Make sure you can set the bowl just inside of the pot.  There should be room between the bottom of the bowl and the bottom of the pot. 
Add some water in a pot and simmer it over low heat.  Place chocolate in a heat-proof bowl.  When water simmers, place bowl of chocolate inside the pot, making sure the water does not touch the bottom of the pot.  Stir chocolate frequently.
When chocolate is melted, remove from heat.  Submerge marshmallows in chocolate.  If necessary, use a spoon to coat the entire marshmallow.  Holding by the stick, remove the marshmallow, shaking gently to remove excess chocolate.  Immediately coat with desired toppings.  Place stick-side up onto baking sheet lined with wax paper.  When all marshmallows are coated, place in the fridge to harden chocolate.  Serve!  
NOTE:  I generally keep my chocolate over the pot of water so it will stay warm for longer.  If it cools and becomes too thick for dipping, simply place make-shift double boiler over low heat to re-melt chocolate. 

Sunday, May 1, 2011

Saturday Chef's Turkey Black Bean Chili

Like Picasso, I go through periods where I am obsessed with one ingredient.  I’ll put it in everything, much to the annoyance of anyone who frequently eats my food.  
DISCLAIMER: Before I continue, please don’t think that I’m saying that I cook like Picasso painted.  I’m not delusional.  Okay, back to the blog.
I just want to explore the possibilities of new ingredients, broaden my culinary horizons.  And I do so with every new vegetable or spice I experiment with.  
Picasso had his blue period; I had my black bean period. 
I discovered the magic beans years ago and put them in everything from salads to soups to shrimp nachos.  A few months ago, I found a recipe for slow-cooker black bean chili while trolling my favorite foodie sites.  It had tons of great reviews and seemed pretty simple, so I decided to make an attempt.  It was an unmitigated disaster.  I’m not one to cry over bad chili, but I was tempted, mainly because I acted against my better judgment and didn’t rinse the beans.  The recipe said not to.  Epic mistake, and I knew better.  Saturday Chef Rule #8: Trust your instincts!  Listen to that voice inside your head. 
I loved the idea of black bean chili with ground turkey, and the flavors were there, so I did a major overall.  I traded the slow cooker for my trusty Dutch oven.  I rinsed each can of black beans so thoroughly they lightened in color.  I added more vegetables.  After a lot of tweaking and dozens of cans of black beans, I finally got a chili I love.  It’s flavorful, but not overly spicy.  It’s mild enough that my eight-year-old niece will gobble up two bowls of it.  In fact, it was her idea to garnish it with cheddar cheese, a future foodie, that one.  This is a tight, delicious, smooth chili, thanks to the black beans and ground turkey (another obsession of mine).  It’s perfect on its own or you can put it on nachos or a hot dog or anything you want. 
So start your black bean period, and try out this chili for Cinco de Mayo or, ya know, Tuesday. 


Turkey Black Bean Chili

1 lb. ground turkey (85/15 mix)
1 yellow onion, minced
2 tablespoons Extra Virgin Olive Oil
2 cloves garlic, minced
2 cups of bell peppers, red, yellow, orange, green, chopped*
1 teaspoon dried basil (or 5 to 8 fresh basil leaves, chopped)
2 tablespoons of tomato paste
3 15oz cans of black beans, thoroughly rinsed
1 14oz can of diced tomatoes and juice
3 cups low-sodium chicken or vegetable broth
½ tablespoon chili powder
1 ½ teaspoon dried oregano
2 tablespoons apple cider vinegar, divided
Salt, pepper

Add ground turkey to hot, heavy-bottomed Dutch oven over medium-high heat.  Season lightly with seasoning salt or salt and pepper.  Cook until, stirring often, until turkey is nearly cooked through.  Place in bowl and set aside. 
In the same pot, heat olive oil over medium-high heat.  When hot, add minced onions.  Season lightly with salt and pepper.  Sautee onions until they are just beginning to turn golden brown, about 5 minutes.  Add bell peppers and minced garlic.  Cook for about 2 minutes.  Add the can of diced tomatoes and juices, and tomato paste.  Stir and cook until tomatoes are heated through, about 2 to 3 minutes.  Add the well-rinsed black beans, cooked ground turkey and enough  broth to just cover the mixture, about 3 cups.  Stir to combine.  Season with chili powder, dried oregano, dried basil, salt and pepper.
Stir to combine and cook until chili begins to boil.  Add 1 tablespoon of apple cider vinegar.  Reduce heat to low.  Simmer partially covered for 30 minutes.  I just crack the lid a little bit to let steam escape, and the flavors concentrate.
After 30 minutes, stir, taste and adjust seasonings as needed.  Simmer for another 15 to 20 minutes, stirring occasionally.  Chili should be tightening up.  Taste once more and add remaining tablespoon of vinegar and cook for 10 more minutes, uncovered.  Plate and garnish with sour cream or cheddar cheese.  Enjoy! 
*Vegetarian option:  Use vegetable broth instead of chicken and add one can of rinsed chick peas instead of turkey.

Friday, April 15, 2011

Old-Fashioned Strawberry Preserves


If you’re a graduate of the Class of 2000 (give or take a few years), you probably grew up watching, loving and quoting “Friends.” While I never got The Rachel haircut, I was a huge fan of the show. I still record re-runs even though I know almost all the episodes by heart. Don’t judge me.

One of my favorite episodes is “The One With the Jam.” In this season 3 episode, Monica had just broken up with Richard and was flailing to make the break-up mean something. So she decided to start a business selling jars of jam (and eventually have a baby). Joey ate the jam right out of the jaw with a spoon or mounded on scones. It made for great comic relief, but always left me confused as my favorite Welch’s Grape Jelly never tasted good enough to eat from the jar.

And then one day, organic strawberries were on sale at my grocery store and I bought several pints. They were a little over-ripe, so I decided to make preserves. The recipe was easy enough. I quickly realized why Joey devoured them so readily. Homemade preserves taste like the idea of a strawberry—sweet and fresh and a little tart. It is nothing like the jar of Smuckers at the grocery store. It’s luscious and fruity and gooey. I instantly started putting it on or any anything I could think of—biscuits, plain yogurt, ice cream and my favorite, grilled cheese with turkey and provolone. Sounds weird, but it’s divine.

If you have a free hour, take advantage of the spring harvest and cook up some old-fashioned preserves while you watch your favorite episodes of “Friends.”


Fresh berries.


After a quick mash, it's on the way to juicy preserves.


Old-Fashioned Strawberry Preserves
Adapted from recipe at http://www.epicurious.com/


3 1-pint baskets fresh strawberries, hulled and quartered*

2 cups sugar

2 teaspoons lemon juice

Directions
Place strawberries in heavy large saucepan and mash coarsely. Cook strawberries over medium heat until beginning to thicken, stirring frequently, about 6 minutes. Reduce heat to low. Add 2 cups sugar and stir until dissolved. Increase heat to medium and boil gently until mixture thickens and mounds on spoon, stirring frequently, about 24 to 30 minutes. Remove saucepan from heat. Cool.  Preserves will last for at least 10 days. Refrigerate in airtight container.

Makes about 3 cups. 

*NOTE: I like to quarter the strawberries because it makes smoother, juicier preserves, but it is not necessary.  You can hull them and mash them directly in the pot.

Friday, April 1, 2011

Homemade Chocolate Peanut Butter Cups


I have another confession to make, and this one is actually juicy:

I killed the Easter Bunny.

At least I did for my eight-year-old niece, who loved the holiday so much she had adorable habit of wearing fluffy rabbit ear headbands everywhere starting March 1st. A few days after Easter last year, I mentioned shopping for a shirt she got in her Easter basket to my mother, not noticing my niece playing on the floor. Being the little genius that she is, she realized that there was no such thing as the Easter Bunny and was very upset.  I mady my munchkin cry.  I'm the worst auntie ever! 

Since then I make sure not to bring up Santa Claus or the Tooth Fairy within a 100-mile radius of any child for fear of breaking more little hearts, and I send my munchkin little presents for the smaller holidays. Not because she needs it, simply because I feel guilty for killing the Easter Bunny!  And it's really fun.

For Valentine’s Day, I sent her a package of homemade Chocolate Peanut Butter Cups. In a red box covered in glitter stickers. What eight-year-old wouldn’t want that?

These aren’t the store-bought chocolate peanut butter cups. They’re so much better. It’s a mouthful of smooth chocolate-peanut-buttery goodness and few things can top that. You can also use any type of chocolate you like, including bittersweet or even dark.

Growing up is hard, but luckily there is homemade candy to make it that much easier on the parents, aunties and the kids.

Think making them is hard?   These candies can be made in a few easy steps: 

Create the chocolate shell for the bottom and sides.


Pipe in peanut butter filling.


Spoon on chocolate to cover and freeze to set.


Chocolate Peanut Butter Cups
Adapted recipe by Martha Stewart 
 
Ingredients

2 cups sifted confectioners' sugar

1 1/2 cups smooth peanut butter preferably all natural

3 tablespoons unsalted butter

1 pound semisweet or milk chocolate

36 1 3/8-inch paper candy cups

Directions

Combine sugar, peanut butter, and butter in an electric mixer fitted with the paddle attachment. Beat on medium-low speed until combined. Transfer mixture to a pastry bag fitted with a 1/2-inch plain tip, and set aside.

Melt chocolate in a double boiler over simmering water. Keep melted chocolate over hot water near work area. Use the back of a small measuring spoon to coat insides of the paper candy cups with the melted chocolate, making sure to cover the bottom and sides in a thin layer of chocolate. NOTE: I used the round back of a ¼ teaspoon to spoon in the chocolate and spread it evenly around the cups.

Transfer cups to a rimmed baking sheet or muffin tins (which will keep the cups from sliding around). Transfer to freezer until set, about 10 minutes.

Remove cold chocolate cups from the freezer. Pipe peanut butter filling into each cup until three-quarters full. Spoon melted chocolate into each cup to cover. Return to the freezer until set, 15 to 25 minutes. The candies may be served right away, or kept tightly sealed in the fridge or freezer. Eat cold or at room temperature.

Thursday, March 17, 2011

Last Braise of the Season: Portuguese Chicken

It always feel like little special occasion when my favorite magazines arrive, so of course I was glad to see my plastic-wrapped February issue of Bon Appetit in the mailbox a couple months ago. But I actually let out a squeal of glee when I saw that there was an entire section dedicated to braising--my favorite cooking technique.

If there’s one thing I love, it’s a good braised chicken thigh. If you’ve been to this blog more than once, you might have figured that out.

I have plans to plow through several if not all of the recipes in that feature—who wouldn’t want some hearty braised oxtail? The first one I made and loved was the Portuguese Chicken. It is a more exotic than the other braised chicken dishes I’ve made, and that was why I gravitated towards that one. I do admit that I was skeptical about how tender the chicken would be after reading the recipe as it called for not one drop of chicken broth and the prep work was remarkable simple.

I’m happy to report that it is delicious and worth the wait. You get the smokiness from the roasted pepper and the sharp awesomeness of garlic, but there’s also the tang of Dijon mustard and the warm sweetness of the wine. Yesh, I'm channeling a judge on the Food Network’s “Iron Chef America,” but it really is that satisfying. Especially on a Sunday afternoon when the flurries the weatherman predicted turned out to be ten inches of heavy, wet snow.


Portuguese Chicken
Adapted from recipe in Bon Appetit - February 2011

Ingredients

1 cup all purpose flour

Sweet Paprika

6 to 8 chicken thighs

2 tablespoons extra-virgin olive oil

1 14.5-ounce can diced tomatoes in juice

4 ounces thinly sliced prosciutto, chopped (optional)

1 ½ cup frozen pearl onions, thawed

2 large roasted red peppers from jar, halved, cut into 3/4-inch-wide strips

6 large garlic cloves, pressed or thoroughly minced

4 large fresh Italian parsley sprigs

4 large bay leaves

1/2 cup dry white wine

1/2 cup tawny Port

1 tablespoon Dijon mustard

1 tablespoon tomato paste

1 tablespoon butter, room temperature (optional)

Preparation

Preheat oven to 350°F.

Season flour generously with salt, pepper and paprika. Repeat process with chicken. Add chicken pieces to seasoned flour and turn to coat. Heat oil in heavy large skillet over medium-high heat. Add chicken, skin side down, and sauté until brown, 3 to 5 minutes per side. You will probably have to work in batches. Transfer chicken to plate; reserve skillet.

When all of the chicken is browned, arrange it in a single layer in large ovenproof pot. Top with tomatoes and juice, prosciutto, onions, peppers, garlic, parsley, and bay leaves; sprinkle with 1/4 teaspoon paprika. Add wine and Port to reserved skillet. Bring to boil, scraping up browned bits. Remove from heat. Whisk in mustard and tomato paste; pour mixture over chicken and bring to boil. Cover; transfer to oven.

Braise chicken until very tender, about 1 1/2 hours. Discard bay leaves and parsley. Using tongs, transfer chicken and toppings to platter. Return sauce in pot to simmer. If thicker sauce is desired, stir 1 tablespoon flour and butter in small bowl until smooth paste forms. Add flour paste to sauce and whisk to blend. Simmer until sauce thickens to desired consistency, whisking often. Season sauce to taste with salt and pepper. Spoon over chicken and serve.

NOTE: I actually like the peels on my pearl onions, so I don’t peel them.  If you don’t care for them, peel away! 

Monday, February 28, 2011

Quick and Delicious: Pasta with Pancetta

A few years ago, I marched into my kitchen, rolled up my sleeves and began making pasta by hand. Without a pasta marker. Bolstered by a few websites that said such a feat could be done, I forged ahead into the culinary unknown as I had done many times before with delectable outcomes.

This was not one of those times.

I rolled and I rolled until my hands hurt. I cooked it and stood over the bowl as I stared down at not an alluring plate of feathery light pasta, but something that resembled steaming slugs peppered with Italian herbs. And sadly, it didn’t taste much better.

I learned three things that day: the Internet lies; pasta making is a process and an art; and that you should always have the right tools to make food properly.

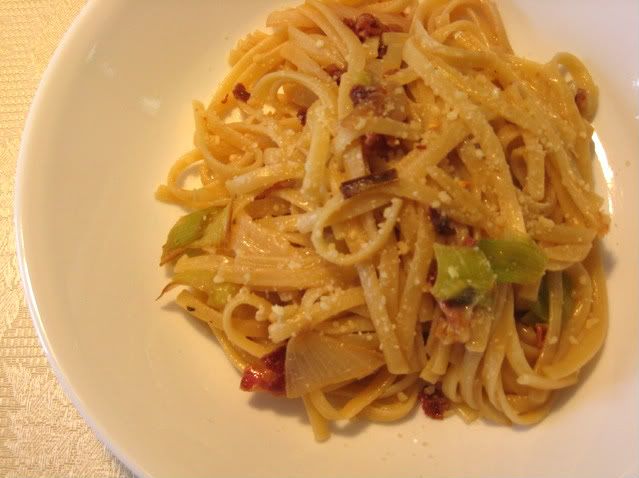
There is no better canvas to create an edible masterpiece than pasta. Smothered in a flavorful sauce or just served with butter, salt and pepper, it has always been a staple and a favorite in my kitchen. Therefore, I’ve collected a pretty extensive list of pasta recipes. I have a select few—my Holy Grail of Carbs—that I will return to again and again. Linguine with Pancetta and Parmesan has become one of them. I put leeks in everything, so I added them to this dish, too. You get the sweet tang of onions as well as the more subtle flavor of leeks. This is a perfect meal for a weekday dinner, because it can be made quickly with items most people have in the pantry or freezer. However, the pancetta, cheese and aromatics add a bit of indulgence to a Tuesday night.


Photobucket

Linguine with Pancetta and Parmesan
Adapted from recipe at Cooking.com


Ingredients

8 ounces of pancetta or bacon, chopped
1 sweet onion, thinly sliced
1 leek, rinsed and sliced, optional
½ teaspoon dried thyme
1/8 teaspoon of red pepper flakes
¾ pound of linguine
½ cup grated parmesan cheese, plus more for serving
Salt, black pepper to taste*

Directions

In a large skillet, cook the pancetta or bacon until slightly crisp. Remove the pork with a slotted spoon onto a plate lined with paper towels.

Reserve two tablespoons of the pork fat and drain off the rest.

Return the pan to medium heat. Add onions and leeks, thyme and red pepper and season very lightly with salt. Cook the onion mixture, stirring occasionally, until it is brown, about 8 to 10 minutes. Remove from heat.

Cooking the linguine in boiling salted water per directions. Reserve about 1 cup of pasta water. Drain pasta. Add pancetta, onions, cheese, and ¾ of reserved pasta water, and black pepper. If sauce is too thick, add more pasta water.

Serve immediately with parmesan cheese.

*Note: Salt this dish very carefully and conservatively. It is very easy to over-salt this recipe as it contains pancetta and cheese.

Thursday, February 3, 2011

Saturday Chef's Cure for the Winter Blues: Creamy Potato Soup

During my senior year of high school, after years of taking advanced classes and being admitted to college, I decided take a couple fun courses—one of them was a cooking class. While, I don’t use calculus or speak French in my daily life, I still make a lot the dishes I learned in that class, especially Creamy Potato Soup. It’s also where I learned the basics of cooking and how many things you can make with a roux.

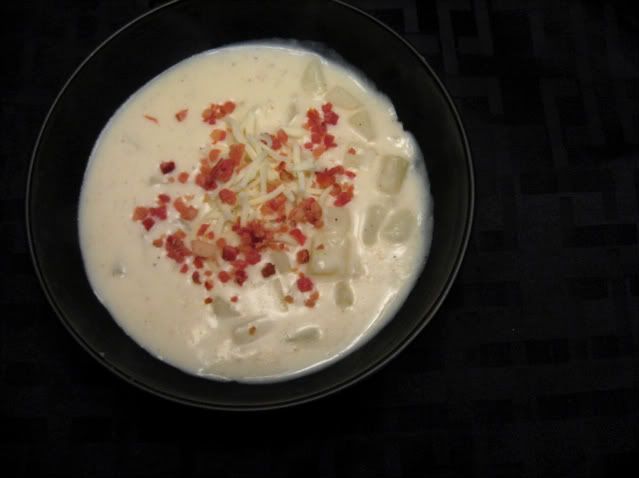
Here in Wisconsin, this winter has been strangely snow-less (at one point, Georgia had more snow than we did.  GEORGIA!), but this week the Midwest was finally walloped with an honest-to-goodness snowicane that made up for the lack of the fluffy stuff. It involved thunder-snow, lightning, 60 mph winds and 14 inches of snow in less than 12 hours. It was AWESOME, and gave me a perfect reason to make this creamy, velvety, delicious, easy potato soup. It’s like a foodie equivalent of your favorite warm sweater. It can be made in less time it takes to dig your car out from a four-foot snowdrift. Even if you’re stuck in the house, you probably have everything you need to make it already in your cupboard. The luscious flavor makes it perfect for garnishing, too. My dad adds canned clams and some juice for a quick chowder—I just stick with bacon and cheese.

Photobucket

Easy Potato Soup


Ingredients
4 tablespoons butter

4 tablespoons all-purpose flour

3 cups milk, warmed

1 to 1 ½ cups low-sodium chicken broth

3 cups russet potatoes, ½’’ dice

Salt

Pepper


Directions
In a large stockpot over medium heat, melt butter. When butter is almost completely melted, but not foaming, add flour and whisk to combine. Cook for roux for 1 minute, seasoning with salt and pepper.

Slowly pour about 1 cup of warmed milk into roux and whisk to combine. Mixture should thicken and smooth out. Stir in the rest of the milk and the chicken broth. Season thoroughly with salt and pepper. Add diced potatoes. Reduce heat to low and simmer, stirring frequently, for about 15-20 minutes, until soup has thickened and potatoes are fork tender, but not mushy. Season to taste. I prefer lots of black pepper. If soup gets too thick, add a bit more chicken broth to thin out.

Serve immediately with a sprinkling of your favorite cheese and chopped bacon.