About The Saturday Chef

Midwest, United States
I am NOT a professional chef. I am what I affectionately dub a Saturday Chef—a weekend warrior of the culinary variety, fortified by the education I have gleaned from two high school cooking classes, the Food Network and my own gastronomical experiments. While I’m not ashamed to spend all day making bagels by hand, and proudly call myself a foodie, I’m not a food snob. I enjoy an Extra Value Meal as much as the next girl. My culinary escapades are still relegated to the weekends, but my love for cooking is stronger than ever, galvanized by more successes than failures, and the beautiful fact that the more I cook, the more people there are to feed. So please stay tuned for fun recipes, inevitable disasters and hopefully, a lot of good food.

Monday, February 28, 2011

Quick and Delicious: Pasta with Pancetta

A few years ago, I marched into my kitchen, rolled up my sleeves and began making pasta by hand. Without a pasta marker. Bolstered by a few websites that said such a feat could be done, I forged ahead into the culinary unknown as I had done many times before with delectable outcomes.

This was not one of those times.

I rolled and I rolled until my hands hurt. I cooked it and stood over the bowl as I stared down at not an alluring plate of feathery light pasta, but something that resembled steaming slugs peppered with Italian herbs. And sadly, it didn’t taste much better.

I learned three things that day: the Internet lies; pasta making is a process and an art; and that you should always have the right tools to make food properly.

There is no better canvas to create an edible masterpiece than pasta. Smothered in a flavorful sauce or just served with butter, salt and pepper, it has always been a staple and a favorite in my kitchen. Therefore, I’ve collected a pretty extensive list of pasta recipes. I have a select few—my Holy Grail of Carbs—that I will return to again and again. Linguine with Pancetta and Parmesan has become one of them. I put leeks in everything, so I added them to this dish, too. You get the sweet tang of onions as well as the more subtle flavor of leeks. This is a perfect meal for a weekday dinner, because it can be made quickly with items most people have in the pantry or freezer. However, the pancetta, cheese and aromatics add a bit of indulgence to a Tuesday night.


Photobucket

Linguine with Pancetta and Parmesan
Adapted from recipe at Cooking.com


Ingredients

8 ounces of pancetta or bacon, chopped
1 sweet onion, thinly sliced
1 leek, rinsed and sliced, optional
½ teaspoon dried thyme
1/8 teaspoon of red pepper flakes
¾ pound of linguine
½ cup grated parmesan cheese, plus more for serving
Salt, black pepper to taste*

Directions

In a large skillet, cook the pancetta or bacon until slightly crisp. Remove the pork with a slotted spoon onto a plate lined with paper towels.

Reserve two tablespoons of the pork fat and drain off the rest.

Return the pan to medium heat. Add onions and leeks, thyme and red pepper and season very lightly with salt. Cook the onion mixture, stirring occasionally, until it is brown, about 8 to 10 minutes. Remove from heat.

Cooking the linguine in boiling salted water per directions. Reserve about 1 cup of pasta water. Drain pasta. Add pancetta, onions, cheese, and ¾ of reserved pasta water, and black pepper. If sauce is too thick, add more pasta water.

Serve immediately with parmesan cheese.

*Note: Salt this dish very carefully and conservatively. It is very easy to over-salt this recipe as it contains pancetta and cheese.

Thursday, February 3, 2011

Saturday Chef's Cure for the Winter Blues: Creamy Potato Soup

During my senior year of high school, after years of taking advanced classes and being admitted to college, I decided take a couple fun courses—one of them was a cooking class. While, I don’t use calculus or speak French in my daily life, I still make a lot the dishes I learned in that class, especially Creamy Potato Soup. It’s also where I learned the basics of cooking and how many things you can make with a roux.

Here in Wisconsin, this winter has been strangely snow-less (at one point, Georgia had more snow than we did.  GEORGIA!), but this week the Midwest was finally walloped with an honest-to-goodness snowicane that made up for the lack of the fluffy stuff. It involved thunder-snow, lightning, 60 mph winds and 14 inches of snow in less than 12 hours. It was AWESOME, and gave me a perfect reason to make this creamy, velvety, delicious, easy potato soup. It’s like a foodie equivalent of your favorite warm sweater. It can be made in less time it takes to dig your car out from a four-foot snowdrift. Even if you’re stuck in the house, you probably have everything you need to make it already in your cupboard. The luscious flavor makes it perfect for garnishing, too. My dad adds canned clams and some juice for a quick chowder—I just stick with bacon and cheese.

Photobucket

Easy Potato Soup


Ingredients
4 tablespoons butter

4 tablespoons all-purpose flour

3 cups milk, warmed

1 to 1 ½ cups low-sodium chicken broth

3 cups russet potatoes, ½’’ dice

Salt

Pepper


Directions
In a large stockpot over medium heat, melt butter. When butter is almost completely melted, but not foaming, add flour and whisk to combine. Cook for roux for 1 minute, seasoning with salt and pepper.

Slowly pour about 1 cup of warmed milk into roux and whisk to combine. Mixture should thicken and smooth out. Stir in the rest of the milk and the chicken broth. Season thoroughly with salt and pepper. Add diced potatoes. Reduce heat to low and simmer, stirring frequently, for about 15-20 minutes, until soup has thickened and potatoes are fork tender, but not mushy. Season to taste. I prefer lots of black pepper. If soup gets too thick, add a bit more chicken broth to thin out.

Serve immediately with a sprinkling of your favorite cheese and chopped bacon.

Sunday, January 23, 2011

Saturday Chef's Heavenly Fruit Salad

I’ve shared a lot of recipes with you, and I’ve done so eagerly. There are some dishes that I love so fiercely that you’ll have to pry their recipes out of my cold, dead fingers. This is one of those recipes. And I’m only sharing it because I have a feeling that if I post one more baked good or dessert bar, the people set on actually accomplishing their New Year’s resolution of slimming down might revolt. I’m stuck in a baking groove. Sorry.

So, with much selfish hesitation, I give you my most cherished recipe: Heavenly Fruit Salad. You won’t find the cheftestants of “Top Chef” banging this out in a quickfire, because it is a straightforward mixture of fruit and sour cream that is amazingly fresh and gives you a happy, sated feeling that I usually associate with heavier comfort foods with loads of butter and cheese. This recipe is open to interpretation and experimentation, add more of your favorite fruits, nix what you hate.

It was given to my mother by a relative when I was a baby and has since be a part of every celebratory meal that I could remember. I even had a bowl at my birthday dinner last week. And yes, I said BOWL. It’s traditionally a side dish, but I have been known to consume it by the pound. In college, during exams, I requested nothing but a vat of this sweet, crunchy, citrusy dish to power me through a hellish week of studying and paper-writing.

So enjoy this recipe in the spirit in which it was given, and enjoy a Saturday Chef favorite!


Photobucket
 
Heavenly Fruit Salad


Ingredients

1 ½ cup red seedless grapes, halved

1 20-ounce can pineapple tidbits, drained well

1 red apple, cored, diced

2 to 3 medium bananas, sliced thin

1/3 to ½ cup light sour cream

1 ½ cups colored miniature marshmallows

Coconut flakes and nuts, such as pecans or walnuts, chopped, for garnish


Directions
Prepare fruit. Cut grapes in half or in quarters, if they are large. Slice apples to be about the same size as the pineapple tidbits. Add the bananas last.

Mix all fruit in a large bowl. Add 1/3 cup of sour cream. Mix to combine. Add more sour cream if needed. Fruit should be covered well, but not too wet. Mix in marshmallows. Serve. Feel free to garnish with sweetened coconut and/or your favorite nuts before serving. Fruit salad will last up to three to five days in the refrigerator, depending on the freshness of the fruit.

Saturday, January 8, 2011

Blueberry Muffins with Streusel

It’s no secret that life isn’t always easy. You get your heart broken. You lose your job. You find yourself on a completely different path than you planned. My favorite way to de-stress is to turn on a guilty-pleasure reality show and dive into a recipe.

After a few hard weeks, I was in need of some serious culinary comfort, and there are few foods more comforting than a warm, blueberry muffin. These particular muffins, adapted from a recipe by Emeril Lagasse, can be mixed and baked in less time than it takes the “I’m Not Here To Make Friends” contestant on your reality show to get sent home. The addition of the sweet, nutty streusel topping is a great way to add some personal pizzazz. So the next time life hands you lemons (and blueberries), bake some blueberry muffins. It’s so much better than lemonade.

Photobucket


Ingredients

Streusel:

1/4 cup all-purpose flour

2 tablespoons butter, softened

2 tablespoons sugar

2 tablespoons finely chopped pecans


Muffins:
2 cups all-purpose flour

2/3 cup sugar

2 teaspoons baking powder

1/2 teaspoon baking soda

1/2 teaspoon salt

1/4 teaspoon ground cinnamon

2 large eggs

1 stick unsalted butter, melted

1 cup buttermilk

2 cups blueberries, fresh or frozen

1 tablespoon grated lemon zest (optional)


Directions

Preheat the oven to 400 degrees F. Line a standard 12-cup muffin tin with paper liners.

Make topping. In a small bowl, add flour, butter, sugar, pecans and zest and mix with fingers until well-incorporated and crumbly . Set aside.

In a large bowl, whisk together the flour, sugar, baking powder, baking soda, salt, and cinnamon.

In another large bowl, beat the eggs with the melted butter. Add the buttermilk and lemon zest and whisk to combine. Add the dry ingredients to the wet. Stir by hand until just combined. Do not overmix. Batter may be a little lumpy. Gently fold in the blueberries.

Scoop into cups until two-thirds full. Crumble the streusel topping over the muffins. Bake until light golden brown and until a toothpick inserted into the center comes out clean, about 20 minutes.

Let cool in the tins for 10 minutes, then remove and cool on wire racks.

Saturday, January 1, 2011

Saturday Chef Original: Pan-Fried Catfish Sandwich with Lemon Aioli

Photobucket

The ball has dropped. You're finding confetti in some very strange places. The champagne is gone. It is a new year! 1/1/11! Time for a new beginning. While I’m not exactly singing about it like Jennifer Hudson on the Weight Watchers commercials (she looks great!!!!), I am starting this New Year, like many of you, with a new outlook on life, food and where I want to be in 2011. And I’d like to be a few pounds lighter, and you know what that means…


Wait. Stop. Don’t leave! I’m swear on my new baking sheets that I’m not abandoning the delicious, often decadent things that you and I love. I’m just going to make healthier recipes too, use more vegetables and fruits, maybe even some whole grain. No brussell sprouts (yet) and rice cakes here. Promise!

We’ll start with one of my favorite foods EVER: Catfish. I love it the most out of all of the fishes in the sea. Sorry, salmon. I was a picky eater as a child, but I would eat an entire catfish happily.

I’m used to eating catfish breaded in cornmeal and fried with a side of spaghetti or my mom’s famous fruit salad. To switch it up, I’d decided to riff on blackened fish and just play with a bunch of spices. The result was a flavorful, healthier sandwich that is ready in 20 minutes or less. It’s a great meal to ring in 2011 or any day of the week!


Catfish Sandwiches with Lemon Aioli


2 medium-to-large catfish filets, fresh or thawed
Salt
Pepper
Cumin
Paprika
Garlic Powder
Cayenne
Extra Virgin Olive Oil
1 to ½ cups wild arugula
4 hamburger buns, toasted

Lemon Aioli, recipe as follows

Directions

Rinse fish. Pat dry. Cut in half cross-wise.

Season both sides of fish with all spices. Make sure to be a bit more generous with the paprika and more conservative with the cumin and cayenne, unless you want it spicy.

Heat a cast iron and 1 teaspoon of olive oil in pan over medium heat. When skillet is very hot—but not smoking—add two filet halves. Cook until golden to dark brown on both sides, about 3 to 5 minutes per side.

While fish is cooking, toast buns if desired.

When fish is done, place it on skillet to rest for 1 to 2 minutes. Spread aioli on the bottom bun. Add fish fillet. Add arugula and top bun. Enjoy.


Lemon Aioli

½ cup mayonnaise
2 tablespoons lemon juice
1 teaspoon garlic powder or 1 clove of garlic, minced
Salt, Pepper

Mix mayonnaise, lemon juice and garlic powder together in a bowl. Season with salt and pepper to taste. If possible, chill in fridge to marry flavors.

Friday, December 24, 2010

Gingerbread Snowflakes (and More Merry Treats)

Christmas is coming.  The goose getting fat.  Or that's just me from all the taste-testing and coopie swaps. 
I spent the better part of two days in the kitchen baking a dessert basket for my family.  I got a little carried away and ended up making so many delicious sweets that my kitchen resembled a buffet fit for Mr. Claus himself. 

I've never made gingerbread cookies before.  I've made edible houses with it (that probably were unsafe even for gumdrop people) and I've smelled the artifical gingerbread in latte and candle form around this time of year.  The cookie itself is spicy and unique and not at all sweet.  Rolling them out is a mini work-out for the arms.  Decorating them is always a sugary good time!   And the benefits?  Frosting with painfully sweet icing is almost a must and your house smells like all things Christmas.  It'll have even the greenest grinch singing carols in no time. 

Photobucket

Gingerbread Snowflakes
by Marth Stewart
6 cups all-purpose flour, plus more for work surface

1 teaspoon baking soda

1/2 teaspoon baking powder

1 cup (2 sticks) unsalted butter

1 cup packed dark-brown sugar

4 teaspoons ground ginger

4 teaspoons ground cinnamon

1 1/2 teaspoons ground cloves

1 teaspoon finely ground pepper

1 1/2 teaspoons coarse salt

2 large eggs

1 cup unsulfured molasses

Directions

1.Sift together flour, baking soda, and baking powder into a large bowl. Set aside.

2.Put butter and brown sugar in the bowl of an electric mixer fitted with the paddle attachment; mix on medium speed until fluffy. Mix in spices and salt, then eggs and molasses. Reduce speed to low. Add flour mixture; mix until just combined. Divide dough into thirds; wrap each in plastic. Refrigerate until cold, about 1 hour.

3.Preheat oven to 350 degrees. Roll out dough on a lightly floured work surface to a 1/4-inch thick. Cut into snowflakes with a 7- inch snowflake-shape cookie cutter. Space 2 inches apart on baking sheets lined with parchment paper, and refrigerate until firm, about 15 minutes.

4.Bake cookies until crisp but not dark, 12 to 14 minutes. Let cool on sheets on wire racks.

5.Put icing in a pastry bag fitted with a small plain round tip (such as Ateco #7). Pipe designs on snowflakes; immediately sprinkle with sanding sugar. Let stand 5 minutes; tap off excess sugar. Let icing set completely at room temperature, about 1 hour. Store cookies between layers of parchment in an airtight container at room temperature up to 5 days.

Royal Icing


2 egg whites
2 teaspoons fresh lemon juice
3 cups confectioner's sugar

Beat egg whies and lemon juice in an electric mixer until frothy. Add sifted sugar. Beat until smooth.

Sprinkle cookies with colored sanding sugars immediately after frosting. 

Photobucket

Best.  Blizzard.  Ever!


Other Treats and Recipes!

Photobucket

Recipe for Salted Caramel Puffs is HERE.

Photobucket

Recipe for Chocolate Toffee Pretzels is HERE.

Photobucket

Recipe for Fantastic Five-Layer Bars is HERE.


Photobucket

Add some cellophane bags, festive ribbons and VIOLA!  You have a gift for the entire family.

Sunday, December 12, 2010

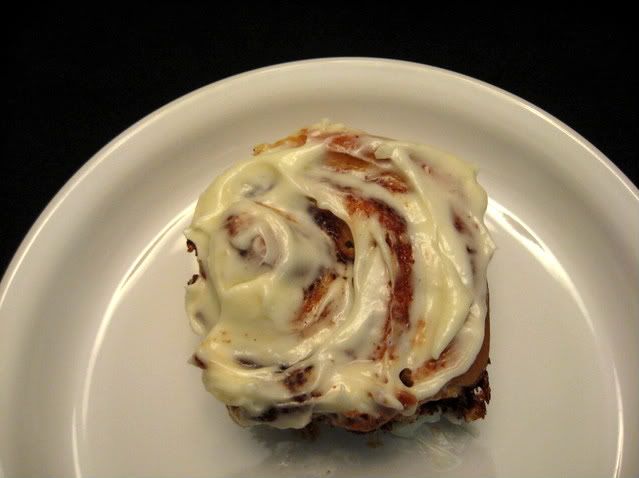
Perfect Holiday Breakfast: Gooey, Amazing Cinnamon Rolls

Photobucket

I often ask people what their last meal would be before shuffling off this mortal coil.  It is interesting to see what people want as the final tastes on their tongues.  I've gotten everything from steak and lobster to sushi to chocolate cake and frosty, cold milk.

My answer varies from day-to-day, craving-to-craving. Right now, it would be a crunchy, golden brown plate of frites with sea salt and malt vinegar with a flame-broiled burger with cheese, bacon and roasted garlic aioli. Or maybe the salmon risotto dish I tasted at Emeril Lagasse’s restaurant at Loew’s Miami Beach years ago. The entrée always changes, but dessert never has. So when I’m 114 years old and on my deathbed, and my rich, exotic 80-year-old husband asks me want I want to eat, I’ll breathlessly ask for…*drumroll* …a gooey, decadent, buttery cinnamon roll.

This breakfast/lunch/dinner/any-time-of-the-day food is one of my carved-in-stone favorites, although I eat and make them more in the winter.  Paired with hot chocolate, it’s the perfect cure for anything Jack Frost can dish out. Like The Winter of Unemployment and 100 Inches of Snow. Or the Post-Christmas credit card bill. Or cabin fever created by the blizzard that’s raging outside right now.

It’s also the perfect thing for Christmas morning. I know, I know, I hear the groans. You have to wrap the presents or go to this party or even do last minute shopping with your cousin who always procrastinates. But you can do this too because making these treats is not nearly as daunting as it seems, especially if you have the right recipe. After trying out a few different ones, this one is it!

There are just a few steps to making cinnamon rolls, but they're simple and fun!

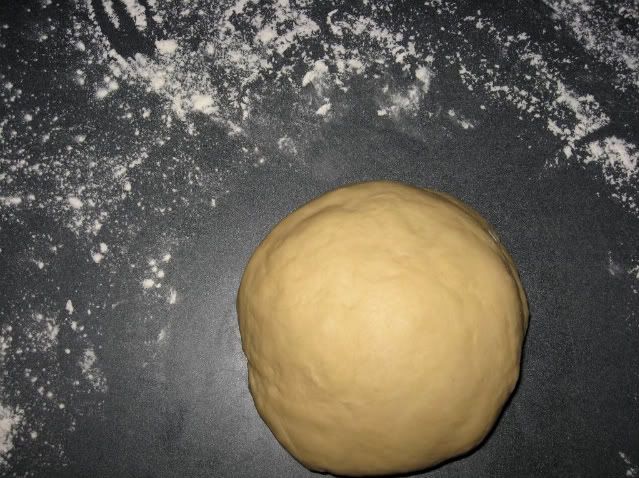
Knead ‘N Rise
Photobucket
Dough has been kneaded and is ready to rise. 

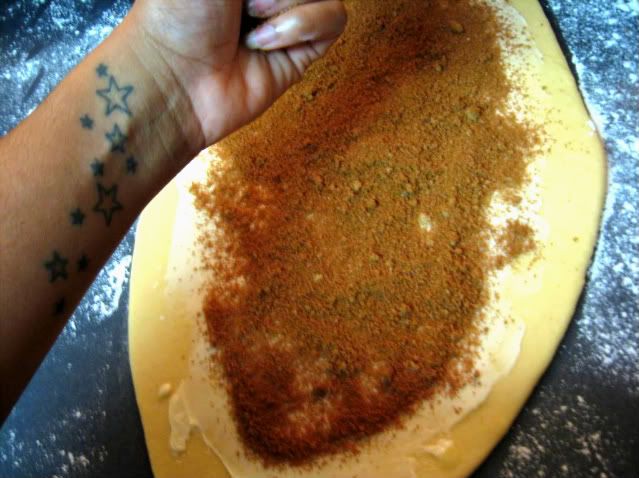
 Roll ‘N Fill
Photobucket
After rising, dough has been punched down; rolled flat; and filled with butter, brown sugar and cinnamon. 
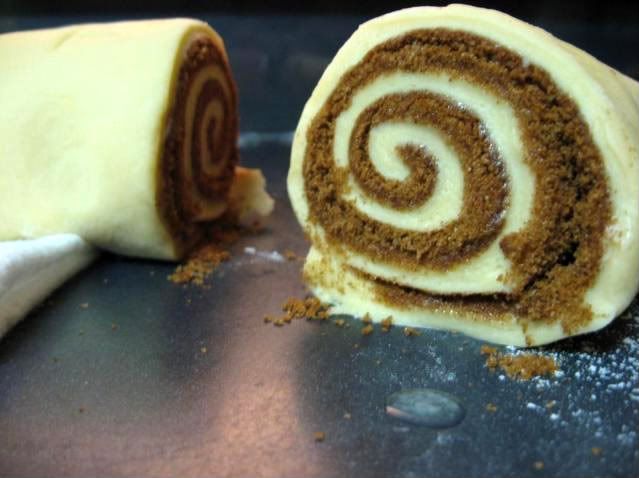
Photobucket
Rolling is easy and fun.   Any sugar that falls out, just add to empty spaces in the baking pan.

Proof ‘N Bake

Photobucket
Rolls have proofed and ready to to bake!  Aww, they're cute, aren't they?


Glaze 'N Enjoy! 
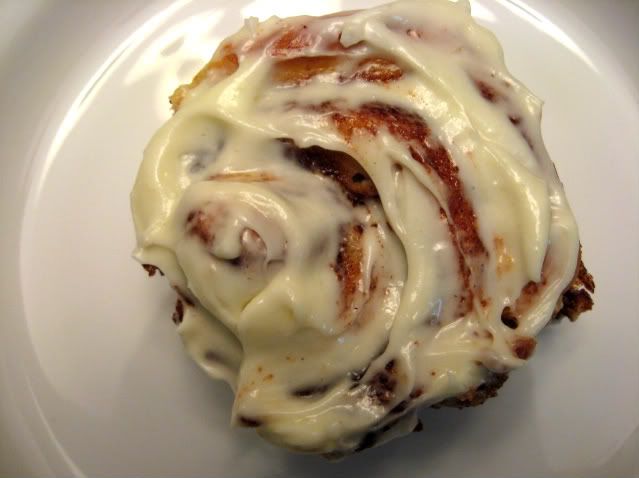
Photobucket
Ready to be eaten.  The fruits of your labor! 

(If you have to ask, then yes, these are technical names for the steps.)

You probably already have nearly all of the ingredients, except yeast.  You get a gold star if you have the yeast. 
Bake these little treats the day before, seal them up in an airtight container, and re-heat them in the morning, and it’s the perfect culinary present for your friends and family. 

And you know how the scent of Cinnabuns lures people to the food court at the mall in a haze of need and  joy?  That happens when you bake these, too.  You're welcome.

Oh, and don’t forget to leave one for Santa. It’ll be a nice break from all of the cookies!


Cinnamon Rolls with Cream Cheese Glaze
epicurious.com


Dough:
1 cup whole milk

3 tablespoons unsalted butter

3 1/2 cups (or more) unbleached all purpose flour, divided

1/2 cup sugar

1 large egg

2 1/4 teaspoons rapid-rise yeast (from 2 envelopes yeast)

1 teaspoon salt

Nonstick vegetable oil spray

Filling:
3/4 cup (packed) golden brown sugar

2 tablespoons ground cinnamon

1/4 cup (1/2 stick) unsalted butter, room temperature

Glaze:
3 ounces cream cheese, room temperature

1 cup powdered sugar

1/4 cup (1/2 stick) unsalted butter, room temperature

1/2 teaspoon vanilla extract

Directions
For dough:
Combine milk and butter in glass measuring cup. Microwave on high until butter melts and mixture is just warmed to 120°F to 130°F, 30 to 45 seconds. Pour into bowl of stand mixer fitted with paddle attachment. Add 1 cup flour, sugar, egg, yeast, and salt. Beat on low speed 3 minutes, stopping occasionally to scrape down sides of bowl. Add 21/2 cups flour. Beat on low until flour is absorbed and dough is sticky, scraping down sides of bowl. If dough is very sticky, add more flour by tablespoonfuls until dough begins to form ball and pulls away from sides of bowl. Turn dough out onto lightly floured work surface. Knead until smooth and elastic, adding more flour if sticky, about 5 to 8 minutes. Form into ball.

Lightly oil large bowl with nonstick spray. Transfer dough to bowl, turning to coat. Cover bowl with plastic wrap, then kitchen towel. Let dough rise in warm draft-free area until doubled in volume, about 2 hours.

For filling:
Mix brown sugar and cinnamon in medium bowl.

Punch down dough. Transfer to floured work surface. Roll out to 15x11-inch rectangle. Spread butter over dough, leaving 1/2-inch border. Sprinkle cinnamon sugar evenly over butter. Starting at 1 long side, roll dough into log, pinching gently to keep it rolled up. With seam side down, cut dough crosswise with thin sharp knife into 18 equal slices (each about 1/2 to 3/4 inch wide).

Spray two 9-inch square glass baking dishes with nonstick spray. Divide rolls between baking dishes, arranging cut side up (there will be almost no space between rolls). Cover baking dishes with plastic wrap, then kitchen towel. Let dough rise in warm draft-free area until almost doubled in volume, 40 to 45 minutes.

Position rack in center of oven and preheat to 375°F. Bake rolls until tops are golden, about 20 minutes. Remove from oven and invert immediately onto rack. Cool 10 minutes. Turn rolls right side up.

For glaze:
Combine cream cheese, powdered sugar, butter, and vanilla in medium bowl. Using electric mixer, beat until smooth. Spread glaze on rolls when they are warm. Serve warm or at room temperature.  Store leftovers in an airtight container and re-heat before serving.

Chef's Note: I do recommend trimming the edges of the dough so you have straight lines before filling.  I did not when I made them for photos, and got some oddly shaped, cinnamony knobs after baking.  Delicious but a little weird.

Chef's Note 2:  I didn't have the right size glass pans as I made these for Thanksgiving morning, so I used a regular 9x13 baking pan without a problem.  The rolls fit and the misshapen pieces went into a smaller pan.